How to Take Before And After Photos for Weight Loss
One great way to track your progress with your weight loss program is to take before and after photos. As much as you might hate the thought of getting your picture taken, the differences you will see can motivate you to even higher weight loss goals. And those “before” photos can be a huge wake-up call!
Before You Get Started
- Take your measurements the morning of the photo shoot, or the day before. Don’t go with measurements that are more than a week old. At the very least, weigh yourself and take measurements of your thighs, hips and waist. For more details, measure even more spots, such as calf, chest, biceps, etc. I highly recommend taking your body fat percentage.
- Pick an uncluttered spot for your photo shoot, either in front of a wall or in front of a door.
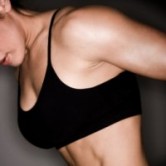
- Men take off your shirt and wear shorts; ladies, wear a sports bra and shorts or a bikini. You want to be able to see your waist, belly, thighs.
- Take the photo in portrait mode instead of landscape. You’ll want to see yourself from head to toes, close enough to see some details.
- If you can get someone to take the shots, great! If not, use a timer—and a tripod, if you have one. I find 10 seconds is just enough time to get into place.
- Look straight ahead, and smile if you want. But don’t cheat by sucking in your gut.
What Shots to Take
These are the shots I take. You can take all different kinds of poses, but get at least a front, side and back shot.
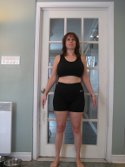
Front View:
Stand up straight with your feed hip-width apart. Arms are at your side but floating off your hips a bit—so you can see the shape and width of your hips.
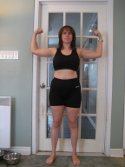
Front View w/ Pose:
Same as above but flex your biceps in a classic weight trainer’s pose.
Side View:
Stand up straight (sensing a pattern here? No slouching!), arms hanging down at your side. Make sure your hands are in the middle of your thigh. You don’t want your hand blocking the outline of your thighs or butt.

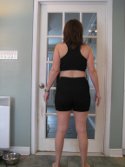
Back View:
Pretty much the same as front view, but with your back to the camera. (Thank you, Miss Obvious!) Smiling is optional!
Back View w/ Pose:
Same as front view with pose. You want to see your upper back definition here.

After the PhotoShoot
Upload the photos to your computer and place them in a folder marked with the date. I set up my file folder system like this: Weight Loss/Pictures/ and then have individual folders named by date. If you don’t track your measurements anywhere else, create a document listing the date, weight and your measurements.
How often you take “after” photos is up to you. I’d recommend once a month, and then on the last day of any challenge you’re doing. I like to do 12 week challenges, so I’ll take photos every 4 weeks. Take the pictures in the same spot and under the same circumstances, wearing the same clothes, if possible.
You can use your photo editing software to make one before/after picture, or use an online service like PicMonkey or Canva (boh free!).
So, that’s how to take before and after photos to track your weight loss. Go ahead and take those photos—you’ll be glad you did after losing the weight!
Must Read
How to Create a 12 Week Countdown Calendar
How to Set a Weight Loss Goal
How To Count Calories To Lose Weight
Flatten Your Belly With These Amazing Fat Burning Secrets

Suzanne Hiscock is a PN L2 Certified Master Coach, ACE-certified Health Coach, as well as an ACE-certified Fitness Nutrition Specialist. For over 20 years, she's been helping people lose weight and get fit through her website, FitWatch.com.
And she’s really TRULY SORRY ABOUT THAT. You see, she didn’t realize she was contributing to diet culture; she just wanted to help people feel better. But losing weight isn’t the way to do it. She’s on a mission to change all that with an anti-diet approach. So, pardon the dust on the floor as the website gets revamped.